How to set up your bounce house? Now you are confused. Not sure what to do at all. After this article, you will feel it is simple enough. Here is my experience and points. Seize these little tips following being a set-up expert.
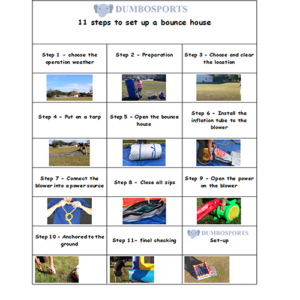
11 steps to set up a bounce house
Now follow up with me. I will list all the points in detail.
Step 1 – Choose the operation weather
Not all weather suits for operation outdoor. Some severe weather, such as wind, rain, snow, etc. can damage bounce houses.
Sudden gusts of wind may lift it off the ground. A tornado will blow it away. Never choose such kind of day for the operation. Outbreak all activities once the unseen happened during use.
Let the kids leave the bounce house immediately. And take down the game as soon as possible if it comes up suddenly.
Watch the weather report before setting up the toy. Here is a weather checklist of what days are suitable what is not.
Ideal weather
- Sunny Day
- Gentle breeze
- Cloudy day
Unfit weather
- Strong winds above 20 MPH
- Heavy rains
- Lightning
- Hail
- Thunder
- Snow
- Tornadoes
- Any other adverse weather
Step 2 – Preparation
Usually, we deliver our bounce house to the customer’s yard. Prepare all tools ready before you start.
We need to check all these things are coming with us. Make sure all of them are available.
It will be terrible if lack any of them. You have to return for picking up. A bunch of time-wasting during this come and back. No one would like to do it in this way. Check all of your belongings before go.
A sense of time is important. No one would like to keep waiting for you. Normal to inflate is about 3-5 minutes for a bounce house in different sizes.
It needs about 30 –40 minutes for the whole setting-up. To clean the location, put on the tarp, roll out, ties the blower and accessories, air inflate, anchor to the ground, and final check.
Don’t forget to count the extra time from your warehouse to the customers’ yard.
Here is a checklist for you to prepare.
- 1 Bounce house
- 5 Stakes(outdoor use)
- 4 Sandbags( indoor use)
- 1 Hammer(outdoor use)
- 1 Tarp
- 1 Extension Power line
- 1 -2 Air blowers
- 1 Dolly
- 30-40 Minutes plus
Step 3 – Choose and clear the location
Choosing and clearing the site would take up most of your time.
Bounce houses have some requirements for the location. A flat, soft, and big surface, for example, the grassy ground will be great.
Sometimes you have to set up it on a hard surface. Such as on top of concrete, asphalt, driveway, etc. Layout a tarp or softcover before fixing it. Do not put the bounce house on a rough surface directly.
For your safe use the bounce house. Choose the correct location is very important. I have summarized these points to help you choose a venue.
- Find a flat ground. Do not put your bounce on a slope or incline. To prevent slips and falls.
- Have enough space for the bounce house. Such as your bounce house is 13 feet lengths by 13 feet width by 12 feet height. You need a space of at least 18 feet lengths by 18 feet width by 17 feet height.
- Stay two meters safe distance away from water, fire, and other dangerous items.
- Ensure the play area is free from furniture, fence, garage, and house, etc. collide sources.
- Clear and clean the fixing area. Keep away from all sharp objects or debris. Such as sticks, gravel, rocks, etc. To avoid puncture the bounce house.
- Outdoor: Pay attention to no overhead obstacles. For example tree limbs, or branches, or laundry lines, power lines, telephone lines, etc.
- Indoor: No overhanging wires above it.
Step 4 – Put on a tarp
Layout a tarp in the perfect location you choose.
It allows if some friends wouldn’t put a tarp under the bottom of the jumper. You can use a groundsheet to protect the bounce house underneath.
Normally I put on a tarp before set up a bouncy castle. It gives me peace of mind. Small investment but a big protector. I will choose a blue, green, or another light color if plan to set up on the grass. For better protecting the lawn. The size should be 4-5 feet oversize the inflated bounce house.
Have no idea on a tarp? Please see my article “do you need a tarp“. It will give you some hints.
Step 5 – Open the bounce house
Your truck is still some distance away from the yard. Here a dolly is necessary, would be a big assistant. It carries your bounce house directly to the tarp.
It is okay if you don’t have it. Move it by hand. Do not drag it on concrete or other rough surfaces. Let’s team up to carry. Lift it over there, one man on each side. Or tilt and pushover there. Even roll on over the place. Look around and watch out for debris.
The orientation of the toy is very important. There are two things to note.
First, make its entrance face to a party or other game. Make it is convenient to your customers.
All games face to face or circled. People can easily and smoothly go from one to another.
Kids can run directly to their party game after jump out from the bounce. The happiness will double. This is a little tip for your to gain favor. It is very important in the operation.
Second, do not install directly into the sun.
Most of us have experienced being hit by the lights of a car coming from the opposite direction at night. Dizziness, instant blindness, and discomfort. Don’t put children through that. That is a bad experience.
Put the back of the roll on the rear edge middle of the tarp.
It is easy to find the back of the toy by finding the blower tube. Usually, the tube is at the back part.
When taking down the inflatable, we rolled it from the front to the back. The blower tube was rolled at the last step. When opened, we can find the tube at the very outside. This helps us to open a bounce house quickly. Isn’t that interesting?
Untie the strips, leave them underneath the moonwalk.
You can return it the same way when you collect the toy. And prevents them not being found when you are packing.
Unroll it from the back toward the front.
Unfold both sides.No need to spread it completely.
Step 6 – Install the inflation tube to the blower
Find the tube nearby the power line. Closeness is the rule when you do this step. That will make things simple. You can use a shorter power line later. Prevents threads from winding around and tripping children.
Pull the tube across the mouth of the blower. The tube must be on the backside of the lip of the blower. Avoid the tube slide down suddenly. Tie the straps and fastened them with the clip tightly.
There are two or more tubes on a game. If you need only one blower for your inflatable. Tie all the extra unused tubes. Fold the tube up in the middle and tie it tightly with the band on the tube.
Step 7 – Connect the blower into a power source
Use an approved grounded outlet. Make sure you have sufficient electrical power. Use an extension cord in case not long enough. You’d better place the blower as close to the power as possible. Connect the blower to the power source.
Pay attention to these points when plugging in.
- Knot the two cords side by side when using an extension cord. Prevents unplugging when someone trips over the cord.
- Far away from water or moisture. If water gets into the blower, disconnect the power cord. Do not open the blower until it is completely dry.
- Make sure the blower power switch is in the OFF position.
- Plug the blower into a power source.
Step 8 – Close all zips
There are one or two zippers on a bounce house. They are on the front, or back, or sides. They are designed for deflation fast. Open Velcro tape and check the zippers. Make sure to close all zippers and Velcro tape.
Please ensure that all zippers are completely sealed. Do not open it during inflation and operation. It is dangerous.
If the bounce house deflated too much, it will soon collapse.

Step 9 – Open the power on the blower
Turn ON the blower power to air-inflating.
- Stretch the tube, make it be straight and untwisted. Adjust the blower if necessary. Make sure the blower is directly behind. Best wind when air is straight in.
- The bounce will unfold itself after air-inflated. Watch and help it in the right position. Sometimes it will slide slightly when inflated. pull it back to the center of the tarp. Sometimes the decorations, trees, leaves, fishes, birds, etc. is unfolded slowly. Go to pull or drag it to get it up quickly.
- The bouncer will inflate in 3-5 minutes.
- The jumping house must always be inflated before and during use.
- The continual air-flow blower must be left ON at all times while the bounce house is inflating.
- If the bouncer moves slightly when inflating, drag it towards the middle of the tarp.
Step 10 – Anchored to the ground
Ground support stakes are used for lawn surfaces. Hook stakes through each loop in the bouncer at a 45-degree angle. Driven it deep in the ground. Stable and firmly anchored. To avoid overturn, lift, or trip during use.
Anchored the toy in 4 corners with stakes outdoor.
- Check stakes regularly during operation. To ensure they remain securely in the ground when using outdoors. This is one of the most important steps of the setup.
- Add an extension strip on the corner if you don’t want to damage your tarp. It will help you to fix the stake into ground directly.
- Insert the ground stake into the hole of the blower base, and firmly fix the blower into the ground.
Anchored the toy in 4 corners with sandbags indoors.
- Hook the sandbags to each corner of the game.
- Each sandbag weighs about 40 pounds.
Step 11- Final checking
To walk around and double-check the bounce house.
I like to do this last step. They are one of the most important safety steps. I will always give them extra attention.
- Walk around and check if air leaks.
- A hissing sound is normal, as air leakage at the seams is necessary. The jumping house is inflated by a constant airflow. This leakage is necessary to prevent it from over-inflating.
- Strengthen all the anchors.
- Check if any holes or rips in the bounce house.
- Make sure all zippers and tubes not being used are tied off and sealed.
- Ensure that the sliding and climbing covers are laid and pulled flat from the top to the end of the slide.
These guys made a very interesting video on Youtube. That shows clearly how to set up a bounce house outdoor. You can watch this set-up video if you want to know a quick overview of the installation process.
I listed all the tips I knew to set up a bounce house. Take them away if you need them. Wish it is useful to you.
Your comments and ideas are very helpful to us. Please leave it directly here.
